The code for building our model can be found on this Google Colab Notebook and the Simple UI can be found on cv-dog-breed-classifier.herokuapp.com. The UI repo for the heroku flask app can be found here on GitHub.
Project Video
Problem And Motivation
Classification has become quite popular in Computer Vision, and being able to classify objects has become much more feasible in recent years. Have you ever strolled through a dog park and seen an unusual dog but have no idea what breed that dog may be? With so many different dog breeds today it's hard to stay in the know. You may see a dog that really captures your attention with it's majestic coat or it's calming tempermaent, but you may be unsure of it's temperament. In our project we will be focusing on creating a Convolutional Neural Net model to be able to classify a dog's breed from an image. We want to attempt to solve this problem by being able to classify a dog's breed by just analyzing an image.
Our Approach
Our approach is to leverage the PyTorch library by using the utility functions for creating datasets like ImageFolder, DataLoader, Image Tensors, Transforms and more. We also want to utilize their pretrained models so we can hit the floor running with our dog breed classifications. By leveraging a pretrained model we can take advantage of a model that has already been trained on over a million images and specially crafted model layers. We will spend more of our time fine tuning the model by focusing on selecting the correct parameters and preparing the data to perform the dog classification training. While we build our model from scratch on Google Colab, we used several references when deciding how to construct DataLoaders and setting up a ImageClassificationBase class. These sources include the medium articles: Dog Classifiers with PyTorch and Building an Image Classification Model From Scratch Using PyTorch . We didn't want to reinvent the wheel and go through the pain of figuring out all of the inner-outs of PyTorch ourselves. So when we constructed our model we used their implementations as a reference so we could focus more on changing the models and parameters to get our desired accuracy rates.
Datasets & Cleaning
The dataset we used was the Stanford Dogs Dataset It contains
images of 120 breeds of dogs from around the world. The dataset contains 20,580 images.
The dataset contained a folder for each breed prepended with some hash like "n02086240-German_shepherd".
To create our labels we looped through the directory and eliminated the prepending string and deleted
underscores to get "German Shepherd" and appended this to a labels array. We now had an array of labels
containing every dog breed within the dataset. Here is a preview of the first 20 labels. (To view the full labels please view the Colab Notebook)
['Chihuahua', 'Japanese Spaniel', 'Maltese Dog', 'Pekinese', 'Shih Tzu', 'Blenheim Spaniel',
                    'Papillon', 'Toy Terrier', 'Rhodesian Ridgeback', 'Afghan Hound', 'Basset', 'Beagle', 'Bloodhound',
                    'Bluetick', 'Black And Tan Coonhound', 'Walker Hound', 'English foxhound', 'Redbone', 'Borzoi',
                    'Irish Wolfhound']
The dataset did not come with train, valid, and test folders so we had to create our own. We chose to
use 25% of the images in the dataset as testing images, and leveraged PyTorch's random_split method to
create a test dataset consisting of 5300 images, a valid dataset consisting of 1440 images, and train
dataset consisting of 13840 images.
The images contained within the dataset were not sized the same, and because we wanted to use a CNN model we needed to ensure they had the same dimensions. Pytorch's ImageFolder method
takes a transform argument which transforms each image in the folder. We use PyTorch's Compose utility to transform each image into a Tensor and then resized the image to 256x256 pixels.
Before (500 x 333)

After (256 x 256)

We also performed random rotations on our training dataset to let our model be rotation invariant. With our PyTorch compose method, we used a random rotate on the images on the training dataset so or CNN will be fed randomly rotated images. Here is an example of a rotated image from the transformed training dataset.

Initial Model Selection & Definition
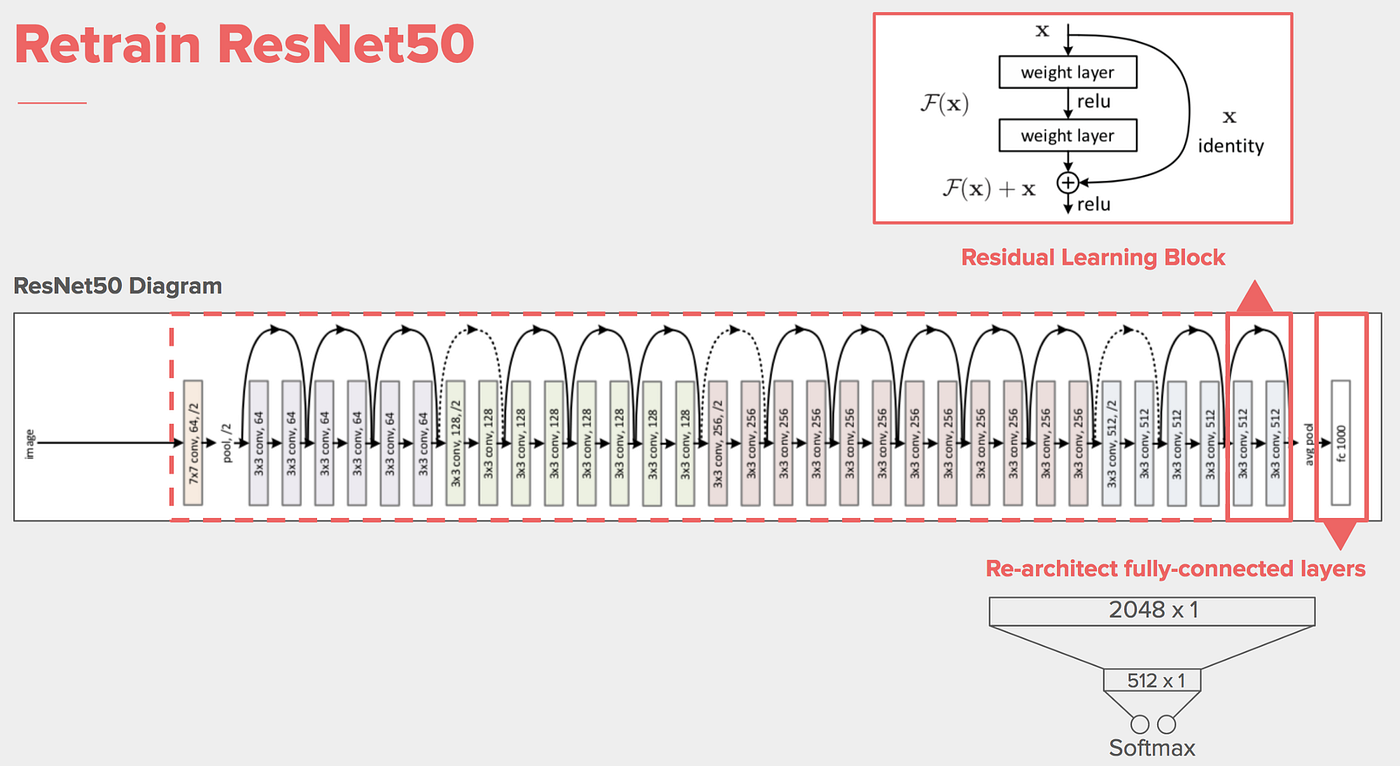
We wanted to used a pretrained model to aid in our classification so we needed to choose a model from one of PyTorch's available models. Unsure of which one to go with, we decided to go start with Resnet50 as it was highly acclaimed and with 50 layers and pretraining of over a million images, we thought this would be a good starting spot.
Following some references we found online, we needed to create an ImageClassificationBase class which would be a super class of the pretrained model. We then created a class PretrainedResnetModel in which we overwrote the last layer in the model. We use a sequential layer where we took in the previous layer output and outputted 120 (the number of dog breeds). We then took the LogSoftMax to convert the output into a probability distribution.

Choosing Parameters
Each time our model trains, it will be getting a batch from a dataset which we have configured to be 64 images. Which you can see below.

We had to choose several parameters when training our model such as the learning rate, epochs, weight decay, and an optimization function. We decided to use a trial and error approach to determine what parameters we should use. We put the results of our investigation into the tables below.
| Model | Num Epochs | Learning Rate | Weight Decay | Accuracy |
|---|---|---|---|---|
| ResNet-50 | 5 | 0.1 | 0.0001 | 65.9% |
| ResNet-50 | 5 | 0.01 | 0.0001 | 80.77% |
| ResNet-50 | 5 | 0.001 | 0.0001 | 78.43% |
| ResNet-50 | 5 | 0.0001 | 0.0001 | 25.53% |

| Model | Num Epochs | Learning Rate | Weight Decay | Accuracy |
|---|---|---|---|---|
| ResNet-50 | 5 | 0.01 | 0.001 | 81.77% |
| ResNet-50 | 5 | 0.01 | 0.0001 | 82.37% |
| ResNet-50 | 5 | 0.01 | 0.0001 | 82.19% |
| ResNet-50 | 5 | 0.01 | 0.00001 | 83.71% |

After our trial and error sessions, we decided to start our parameters at with a learning rate of 0.01, a weight decay of 0.0001. After running 15 epochs, our accuracy rate was at 88%.
Trying Other Models
We decided to try four other models to compare our results with. We chose GoogleNet, VGG16, Wide Resnet-50, and Resnet-100 to test. After hours of training we have put the results in a table below.
We had to choose several parameters when training our model such as the learning rate, epochs, weight decay, and an optimization function. We decided to use a trial and error approach to determine what parameters we should use. We put the results of our investigation into the table below.
| Model | Num Epochs | Accuracy |
|---|---|---|
| ResNet-50 | 10 | 82% |
| Wide Resnet-50 | 10 | 85.12% |
| Resnet-100 | 10 | 81.4% |
| GoogleNet | 10 | 77.4% |
| VGG16 | 10 | 76.3% |


After these tests, our best performing model was the wide resnet-50 pretrained model with a validation accuracy of 85% after just 10 epochs. We can see after the first epoch it was already in the 70's for it's accuracy percentage. Meanwhile the VGG16 model and GoogleNet models started much lower around 30-40% but quickly rose to the 70's after 8 epochs. We decided to stick with the wide resnet-50 model for further training.
Results
Now that we had narrowed down our model to wide resnet-50. We performed a series of training sessions on the model with varying epochs. We had gotten our model up to a training accurracy of 87.3% and now we tested it. We used our testing dataset consisting of 5300 images and looped through each image in the dataset and had the model predict the breed. Out of 5300 images, the model correctly predicted 4579 images which is a testing accuracy of 86.4%.
We can visualize our model making predictions in the image grid below. The images predicted here are from the test dataset, and the model has not been trained on these images. We can see that the model nearly correctly predicted each of the below dog breeds in the images below. It can event predict dog breeds when images have other objects like humans.


Great! Our model was able to predict dogs in images like the Clumber on the last row even with a person taking up a majority of the photo. It seems like our model was a success!
Now that we were happy about how we tuned and trained the model, we wanted to make it accessible people to choose their own images for our model predictions.
Simple Web Deployment
While we had our model on Google Collab, we wanted users to be able to interact with our model and load their own images to test. We decided to use Flask to deploy a simple web server on Heroku to host our model logic. We built a very simple UI that allows a user to provide a link to an image or upload their own image. The image will then be sent to our model and it will make a prediction.
We had to figure out how to host our model on Heroku without requiring a user to download large files when loading a web app. We decided to train a web specific model using GoogleNet which was only 20mb in syze compared to 260 mb from the resnet model. Because of this, the web accuracy model would only be 79% instead of the 86% we achieved using wide resnet. We then used the pickle library to serialize and compress our model that heroku could then load. We also ran into memory errors trying this due to PyTorch's library being too large. We solved this by finding a cpu specific PyTorch library which reduce the server size by several hundred mb. With these fixes we were able to deploy a very simple web version of our model, which you can see below.
You can visit the site on cv-dog-breed-classifier.herokuapp.com.

Discussion
Problems Encountered
When we first started we loaded a pretrained model and didn't realize we needed to replace the last layer in the model. This led us to looking through StackOverflow until we realized we needed to overwrite the last layer.
We also ran into ours during our model building/training process because our images weren't the same size. We had to research how we could resize the entire dataset to get our CNN to function, and we had to discover the PyTorch transform resize() method to do this.
Memory errors. We often ran into cuda memory errors due to bad parameters or batches that were too big. This led to us refining our parameters often.
Next Steps
Our next steps would be to expand the UI so the images users provided would also train the model. We could create functionality for a user to provide what the real label of the dog was if they know, or provide an input for saying if the prediction was correct. Our web version also uses a slightly lower accuracy model due to a smaller file size on the Heroku free tier. We would like to use our stronger models in a webapp so we can have higher accuracies.
Takeaways
Overall, this project was full of learning. We got experience cleaning data with python, creating datasets, discovering new models, and learning about how to finetune parameters. We learned about the utilties of the PyTorch library and how to quickly build a ML model using their pretrained models. We also gained experience with Flask and deployments, and how to compress fully built models into a pickle format for deployment.
